Here are the referance for technical information
How a camera shutter works
How the shutter works
shutter mechanism
1
2
3
The shutter mechanism controls how løng the sensor is exposed to light
here are the key things you need to know ….
- the vertical-travel ‘focal-plane’ shutter
sits just in front of the sensor on a typical digital SLR
- Two thin blinds
move up and down: one opens to start the exposure, the second closes to end it.
both blind are open at some point during a long exposure, but for a fast exposure, tthe second blind begins closing before the first has finished opening
this means that the sensor is exposed through a moving slit
- the mechanical shutter
is controlled electronically it’s livespan varies between camera models and it may eventually need to be replased.
how does cload cover affect my photo
visual ligth
explain skies and light
arrow and skies trees
When it comes to judging how cloads will affect your photos, the rule of the thumb is that the more cloud cover there is the more soft (deffused) the available light will become.
1 Deep clouds
the deeper the cloud, the softer the light becomes.
2 Light clouds
Light clouds create semi-diffused light, wich give you good colour and recognisible shadows.
3 Desused lighting
Very diffused lightning creates weak shadow and muted colours. These conditions can be giid for shooting in black and white if the colours in the sene appear washed out
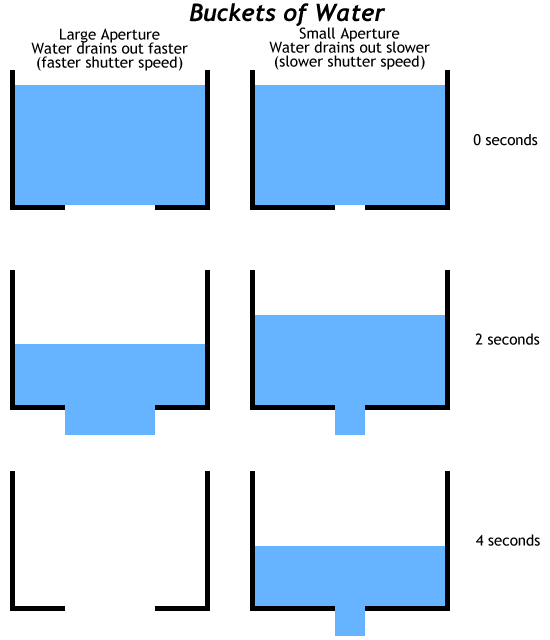
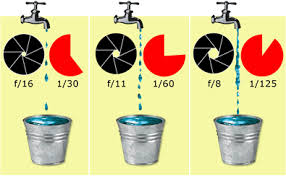
how does exposiure work on my camera
Pocket referance
how does exposiure work on my camera
- Apperture = wheel turns on opening the tap
·
- Intencety of light = pressure of wather in the tap
·
- ISO setting =size of bucket of wather
·
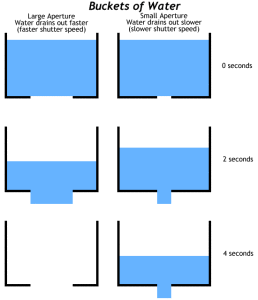
- Shutter speed = opening time for the water tap
·
what happens here ??
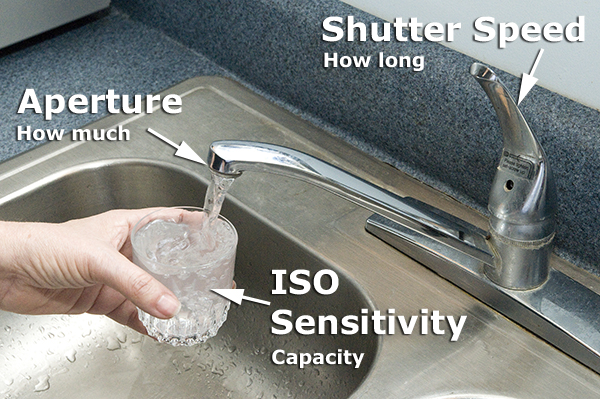
As shown in figure below, let’s directly compare the concept of filling a glass with water (getting a nice drink) to taking a picture (getting a nice exposure):
·
- Water = light: The water satisfies your need for a drink in a similar way to how the light satisfies your desire for a good exposure.
·
- Faucet nozzle = aperture: The camera’s aperture is like the nozzle of the faucet where the water comes out. The size of the faucet’s opening controls how much water volume can flow into the glass in the same way the aperture opening controls how much light volume can get to the camera’s imaging sensor. A large aperture opening, such as f/2.8 lets in more light than a small aperture opening (f/11).
·
- Faucet handle = shutter speed: The camera’s shutter speed is like the handle of the faucet. The handle controls how long the water runs into the glass in the same way the shutter speed controls how long the light hits the camera’s imaging sensor. A slow shutter speed (1/60th of a second) lets light come in for a longer time than a fast shutter speed (1/500th of a second).
·
- Glass = camera’s imaging sensor: The glass is like your camera’s imaging sensor. It is a container for water, like your camera’s sensor is a container for light. To satisfy your thirst, the glass should be full of water, not half full, and not running over. In the same way, the camera’s imaging sensor should have a full exposure, not underexposure, and not overexposure. The capacity of the glass controls the amount of water it will hold. If you use a large glass, it will hold more water, while a smaller glass holds less water. The ISO sensitivity is like the capacity of the glass. A low ISO sensitivity (ISO 100) will only gather a little light, in the same way a small glass will only gather a little water. A high ISO sensitivity (ISO 400 and above) is like using a large glass to collect more water (light).
·
This basic concept is how the camera’s exposure controls are related to one another. Similar to how the faucet controls manage water flow, the camera controls manage light flow.
·
To understand how differnt camera settings will affect the exposure,
it can help to use the analogy of filling a glass of water from the tap
when you imagine light going into your camera
·

·
- Apperture
this is how mutch the tap is turned;
a wide aperture is like more turns,
whilea smal aperture is fewer.
·
- Intensety of light
This is like the water pressure
Bright light is like high pressure,
and dim light is low pressure.
·
- ISO Setting
The ISO setting is like the size of the glass
a smal glass filles more quickly,
so it’s like a high ISO
·
- Shutter speed
This is simular to how long the tap is left on.
The longer it’s open the more wather
(or exposiure on the camera) there will be.
·
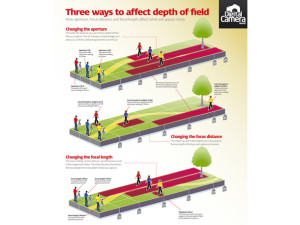
How focal lenght affects depth of field
Pocket referance
How focal lenght affects depth of field
Lens length in mm and distance to dof & dept in mm
Changing the focal length of the lens you’re using can create dramatic changes in depth of field without you adjusting any camera settings.
·
For example a subject 4.5 meters from a camera set to use an aperture of f/8
- With an 200 mm lens
using a long focal length lens produses a narrow depth of field at a distance between 4.43 and 4.57 meters
·
- With an 55 mm lens
At this middle focal length the depth of field is two meters, extending from 3,68-5,79 meters away
·
- With an 18 mm lens
With a short focal length lens, the dept of field will extend from 1.4 meters all the way to infinity
·
HOW ISO CAN ADJUST FOR LOW LIGHT CONDITIONS
Pocket Referance
HOW ISO CAN ADJUST FOR LOW LIGHT CONDITIONS
picture here
Lots of Light
Little light
–
Your camera’s ISO setting regulates the image sensor’s sensibility to light:
·
- Lots of light – bright conditions
In bright light, there will be a strong electrical signals from the sensor.
So it doesn’t need much amplifictation or «Gain» to record an image
·
- Little light – dark conditions
When less light reaches the sensor it will produse a weaker electrical signal.
This will need amplifying by increasing the ISO to record an image, but this will increase the noise in the image
·
- Other optiont in dark contitions
You don’t need to increase the ISO in dark conditions:
you could use a longer shutter space or a wider aperture, allowing you to ues a lower ISO and still give the correct exposure
·
How live view focusing works
live view
focusing contrast
Back focus: Low contrast
Correct focus: peak contrast
Front focus: low contrast
Most cameras use contrast-detection autofocus during Live view.
This is based on the idea that sharp focus is achived at the point of highest contrast
- Its slow
to detect the point of peak contrast, the lens has to be focused backwards and forwards across the subject.
- Its accurate
Because Live View autofocus measurees the contrast directly from the sensor, what you see on the Live View scrren is what you get.
- It goes wide
You’re not limited to the position of the AF points you see in the viewfinder. Use the control wheel to place the focus point at the edge of the picture if you need to.
How sun and the sky effect colours
Pocked referance
How sun and the sky effect colours
1 blue wavelength
2 relative brightness
3 shadows
Sunlight and skylight
Even though the wite balanced of sunlight is relavtively warm, a significant persentage of daylight has been reflected back towards the earth by the atmosphere.
·
This is known as skylight, and can mean that your images will appear cooler when you shoot a sunny day
·
- blue wavelength
of light are reflected better by the atmosphere than other wavelengths are, making it appear much cooler than sunlight.·
·
- shadows
are lit only by skylight and so appaer «cooler» than areas that are lit directly by sunlight
·
- relative brightness
of skylight and direct/diffuse light from the sun varies depending on time of day and the prevaling wether conditions·
·
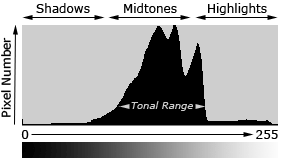
how to read histogram
Pocket referance
how to read a histogram to assess expoure
- The horisontal axis of the graph represents the brigtness level, from darkest on the left to the brightest on the right
·
- The vertical axis how many pixels in the picture are at that brightness level.
·
The histogram feature on your camera illustrates the range of tones or brightness level that are pressent in a picture.
·
Take a shot , then chech its histogram, pay attention to ….
·
- The shadows
The left of the graph contains the shadows.
This should just touch the extreme left; if it overlaps this end, some details has been lost in the darkest areas.
·
- The midtones
This Area is less critical than the highlight or the shadows, but it extend the top of the graph.
·
- The highlights
The right of the graph shows the brightest area of the image.
If it overlaps the right of the graph, you have lost some detail in the highlights.
·
Select different type of AF points
AF types
select fast and easy AF
Combined picture with important places in the camera, and lens ….
1 set lens correct.
check if your lens have a M/A setting
select A
2 Camera selector AF/M
select AF
3 Camera AF/M push button
press and hold this button
4 Camera rear selector (wheel)
rotate the wheel
you will see that the type of AF points are changing,
singel , all, 3d ……
single af mode
AF modes
select correct af
1 choose an AF point
use the control wheel or a thumbstick to select an af point directly.
You may have to press a selection button first
2 Highlight the subject
Choose an af point that corresponds with the most important detail, such as a person's eye i a portrait.
3 Focus and recompose
if the af point doesn't line up with the subject, move the camera until it does.
Keep the shutter button half-pressed to lock the focus, then recompose the shot.
Use the colour wheel for better shots
Pocket Referance
Use the colour wheel for better shots
–
Pictures here
–
The colour weels :
·
- Warm Colours
Yellow, Orange, and Red give your shot warmth, but they need to be used with care.
Red in particular has a strong positive and negative connotations
·
- Cool Colours
When an image contains mostly cool colours such as Blue and Green, it will appear calm and restfull, because these colours are most assosiated with non-threatening subjects
·
- Primary Colours
Using primary colours (Red, Yellow, and Blue) creates a bold statement.
·
- Complementary Colours
Choose opposite colours from the colours wheels to find pairs that complements each other in a shots (Yellow and Purple for example)
·
What an aperture looks like
Pocket Referance
what an aperture looks like
–
Picture here
–
The consept of an aperture can be tricky to understand, so it helps to know what’s actualy going inside your lens.
·
It’s actualy quite simple …..
·
- Iris blades
The aperture inside the lens is created by a diaphragm formed by intersecting blades.
These usually number between five and nine, depending on the lens.
The higher the number of blades the rounder the bokeh will appear.
·
- Lens components
The aperture assembly containg the diaphragm is located inside the barrel of the lens, between the lens elements.
·
- Motor
On most lenses , the iris blades are operated by a motor in the lens.
These are normally wide open, and close when you fire the shutter.
·
What is hyperfocal distance
Pocket Referance
What is hyperfocal distance
Near limit of depth of fields (half the hyperfocal distance)
·
Infinity (far limit of depth of field)
·
Subjects placed between the near limit and infinity appear sharp
·
- What is hyperfocal distance ?
The hyperfocal distance is the distance that you focus on so that the image will be sharp from the far distance (infinity) to a distance halfway between the camera and the distance you have focused.
·
- What affects hyperfocal distance?
The main settings that affect it are the focal length and aperture, but the sensor size of your camera will also affect the distance.
·
- How to work it out
there’s a table avalable at http://www.digitalcameraworld.com/2013/02/08/how-to-calculate-hyperfocal-distance-free-photography-cheat-sheet/3/
giving the hyperfocal distances for different camera focal lenght, aperture and sensor size’s, shown below, alternatively you can use an app such as HyperFocal Pro or Field Tools
·

Whitch apperture setting should i select
apperture
select apperture
apperture 1.8 -> 4 wide
5.6 -> 11 medium
16 -> 32 small
1 wide appertures f/1.8-f/4
The widest apertures have f-stops with the smallest numbers.
They provide a shallow depth of field, whitch is great for simplifying backgrounds.
2 medium apertures f/5.6-f/11
The middle apertures on your lens tend to give you the best quality images.
However, they might not give you the ammount of depth of field you requiere.
Think of it as a balancing act, with some compromise requiered.
3 Small appertures f/16-f/32
Most lenses have a minimum aperture of f/22, while others go down to f/32.
As the aperture gets smaller the delpth of fields increases.
Ultimately, though, the image resolution deteriorates due to diffraction.


 [ic_add_posts category=’mat’]